

Break and Retest is considered one of our most complicated indicators ever created with over 1,400 traces of coding. It is simply among the best technique you possibly can have in your buying and selling instruments as a result of it is based mostly on pure worth motion!
⚠️ To be sure that Break and Retest works correctly, here’s what you have to see on the high left of your MT4 chart:
Well being: Working Okay…
Standing: Scanning for a Break & Retest entry…
What’s Break and Retest?
The important thing thought behind our Break and Retest technique is to attend for the worth to interrupt via a assist or resistance stage, after which return to that stage, to retest it. Now, earlier than getting into the commerce, our indicator seems for wick rejections indicating that merchants are actively defending this retest stage. After successfull wick rejections, we look forward to the candle continuation to lastly get purchase & promote alerts telling us to enter the commerce!

Often when there’s a development, there’s all the time retest ranges earlier than the market continues the development. We look forward to merchants to reject the retest stage to point out us an indication that they need to proceed with the development and never break it. When we’ve got a number of rejection indicators on the retest stage, we look forward to the candle continuation to type earlier than getting into the market with a commerce! Right here is an instance:
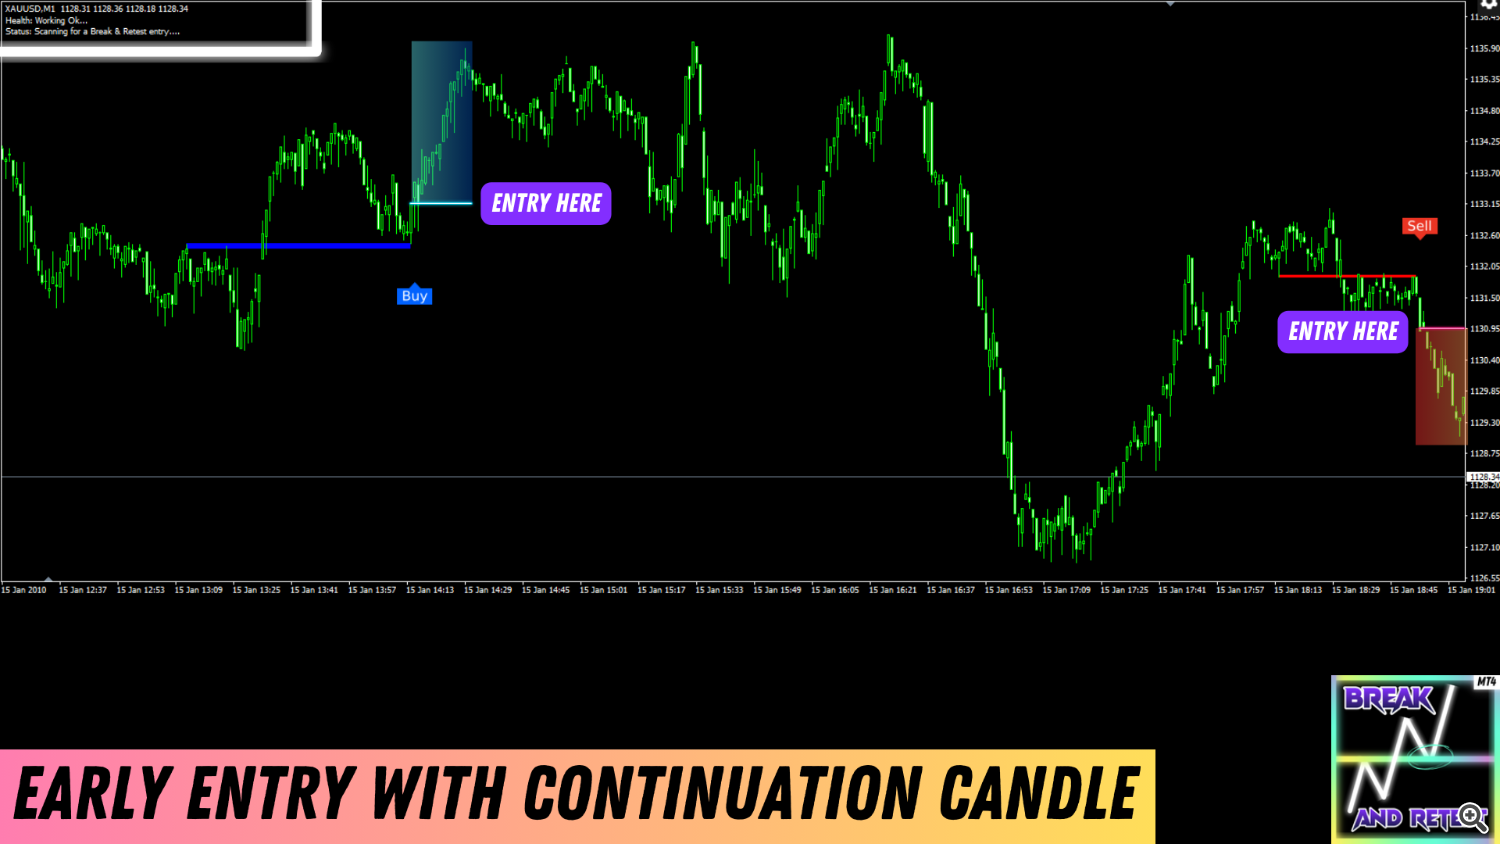

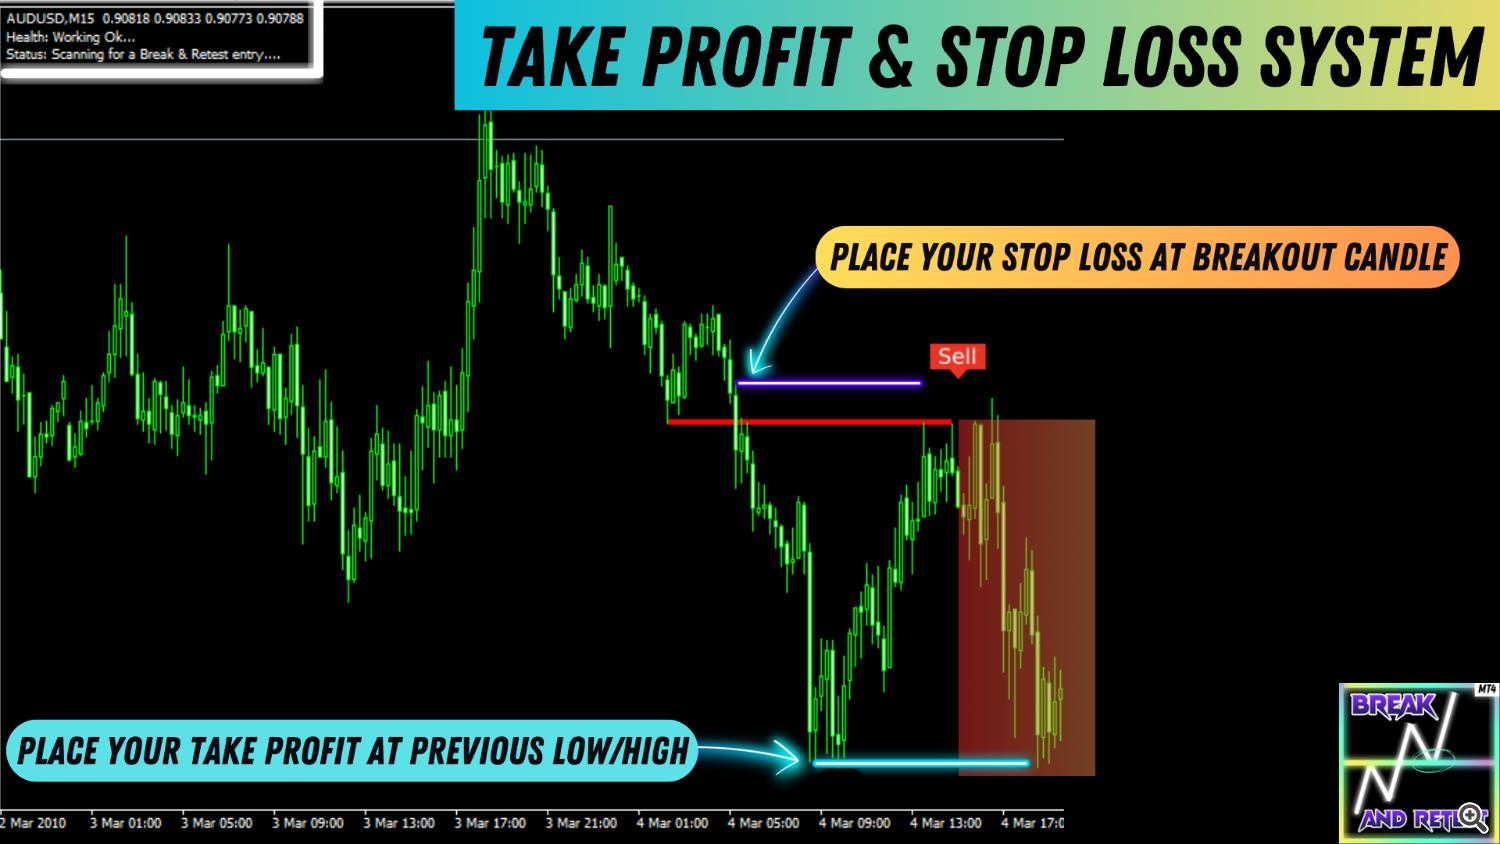
After we see that there’s a continuation candle transferring away from the retest zone within the route of the primary development, we enter our commerce! When you enter the commerce, you have to know your take revenue and cease loss stage. For our cease loss, we often place our cease loss on the breakout candle that broke the assist and have become an new resistance zone. For our take revenue, we often place our take revenue on the earlier low or earlier excessive candle. Right here is an instance:

Break and Retest Parameters
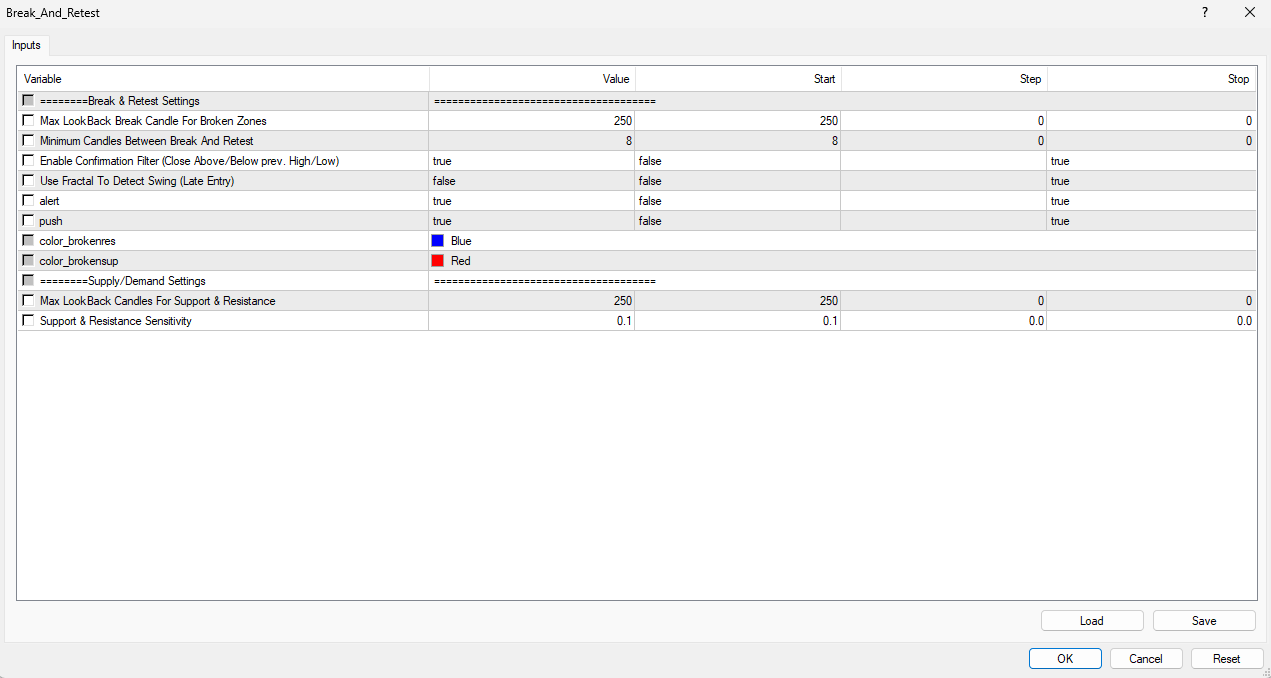
Whenever you connect Break and Retest to a chart, right here is the primary settings that can pop-up. Discover under the reason of every enter:
Break & Retest Settings
- Max Lookback Break Candle For Damaged Zones: 250 by default. What number of earlier break candles would you like the indicator to recollect for a doable retest.
- Minimal Candles Between Break And Retest: 8 by default. What’s the minimal candles required between a break and a retest. Larger quantity offers extra room for clear retests.
- Allow Affirmation Filter (Shut Above/Under prev. Excessive/Low): True by default. True implies that when there’s a retest, indicator waits for the affirmation candle after the wick rejection.
- Use Fractal To Detect Swing (Late Entry): False by default. If set to true, after a retest, the entry sign will seem after a number of affirmation candles. Fractal implies that we wait to have the best excessive or lowest low of the candlesticks. Which means that you’ll enter your commerce after a late retest.
- Alert: True by default. When a brand new sign seems after a retest, you’ll get a notification for both purchase or promote in your MT4 terminal.
- Push: True by default. When a brand new sign seems after a retest, you get a push notification in your telephone from the Metatrader 4 app.
- color_brokenres: Blue by default. Right here, you possibly can change the colour of your resistance zones.
- color_brokensup: Crimson by default. Right here, you possibly can change the colour of your assist zones.
Provide/Demand Settings
- Max LookBack Candles For Assist & Resistance: 250 by default. What number of candles far again from the precise worth would you like the indicator to memorize the assist and resistance zones. It will make sense to decrease this quantity when you’re buying and selling on smaller timeframes and make it larger if you’re buying and selling larger timeframes. Nevertheless, 250 is a one measurement suits all resolution for all timeframes so that you needn’t change that!
- Assist & Resistance Sensitivity: 0.10 by default. That is the thickness of the assist and resistance zones. If you would like a skinny line, you possibly can decrease the quantity to 0.07 per instance. If you would like a thick line, you possibly can enhance the quantity to 0.20 per instance. We chosen 0.10 by default as a result of we personally really feel prefer it’s the right line width. This parameter can undoubtedly be tweaked on your buying and selling functions!
Tweaking the timeframes
The break and retest technique works on any timeframe. By default, the indicator makes use of a max lookback of 250 candles and a break lookback of 250 candles which is a one measurement suits all resolution for any timeframe. Nevertheless, if you wish to sharpen much more your buying and selling abilities, we suggest attempting our set information (connected under) for every timeframe! Right here is the way it modifications from the default settings:
- M1: 50 candles
- M5: 100 candles
- M15: 150 candles
- M30: 250 candles
- H1: 250 candles
- H4: 500 candles
- D1: 1,000 candles
- Weekly: 2,000 candles
- Month-to-month: 4,000 candles
In an effort to use the set file on every timeframe, you have to click on on the load button in your indicator settings:

The right way to spot a very good break and retest from a nasty one?
When there’s a retest that happens on the assist or resistance zone, you have to visually see that this new zone hasn’t been damaged under or above the degrees. If the zone is damaged by candles and even wicks, this merely exhibits that the zones should not even good candidates for a retest. You wait for one more setup. Right here is an instance between a very good retest and a nasty one:
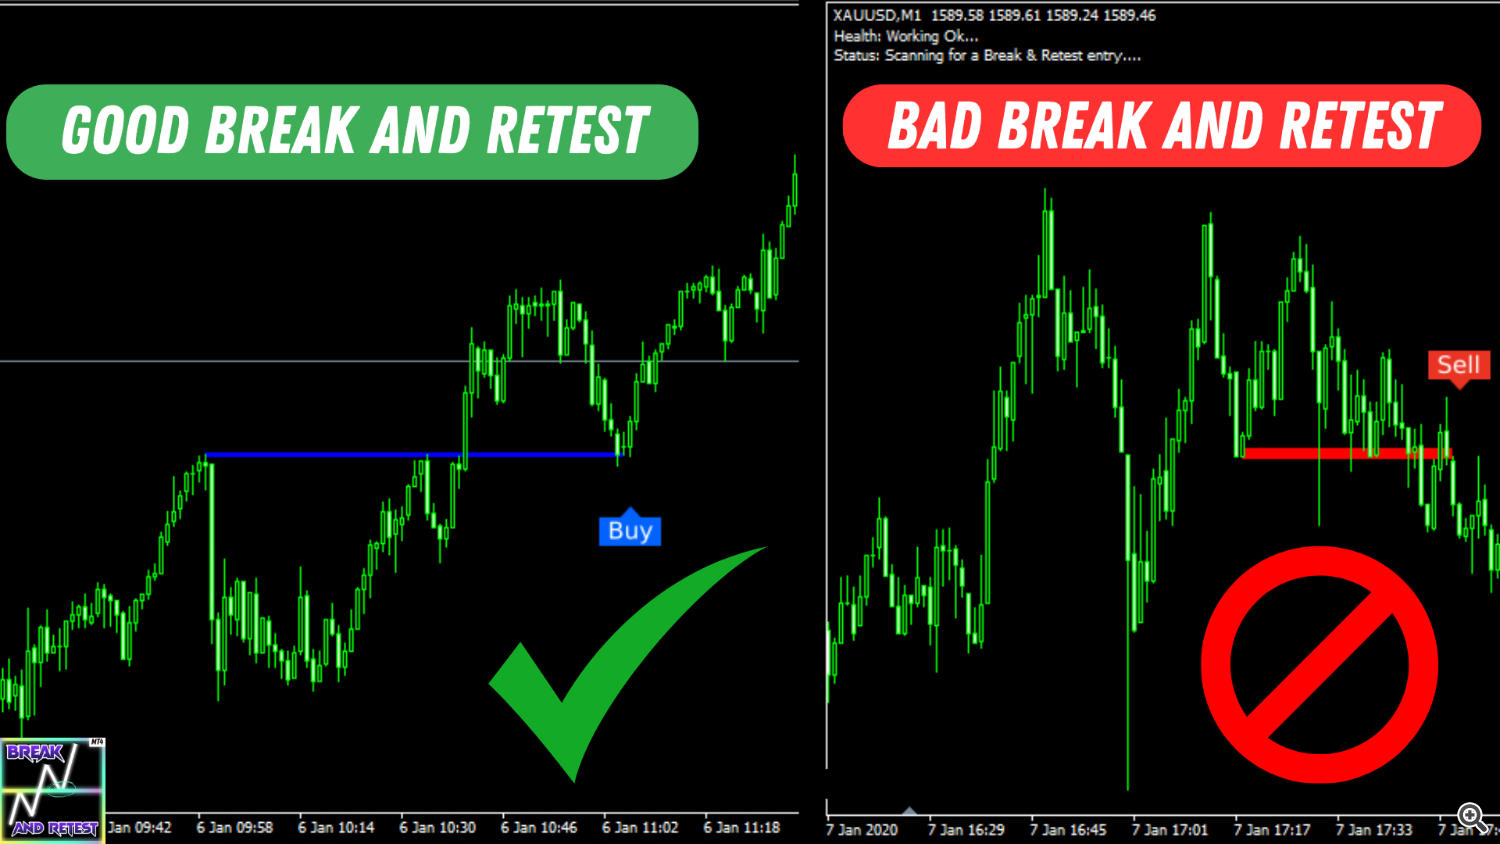
✅ On the left aspect of the image, this can be a good retest as a result of the brand new assist zone hasn’t been damaged earlier than the retest alert. Sure there could be some consolidation candles across the retest zone, so long as these candles did not break the assist or resistance zone. Consolidation is an effective signal as a result of it exhibits that merchants are defending the present stage. We look forward to the continuation candle after which we enter the commerce based mostly on the alert given by the indicator.
⛔ On the suitable aspect of the image, this isn’t a very good retest. It is a unhealthy one as a result of the resistance zone was already damaged by a number of wicks earlier than getting the retest alert. Even when the market went down, I would not enter this commerce as a result of I must see a transparent resistance zone that hasn’t been damaged earlier than the retest. It clears out any doubts concerning the extent itself and makes you commerce with extra confidence!
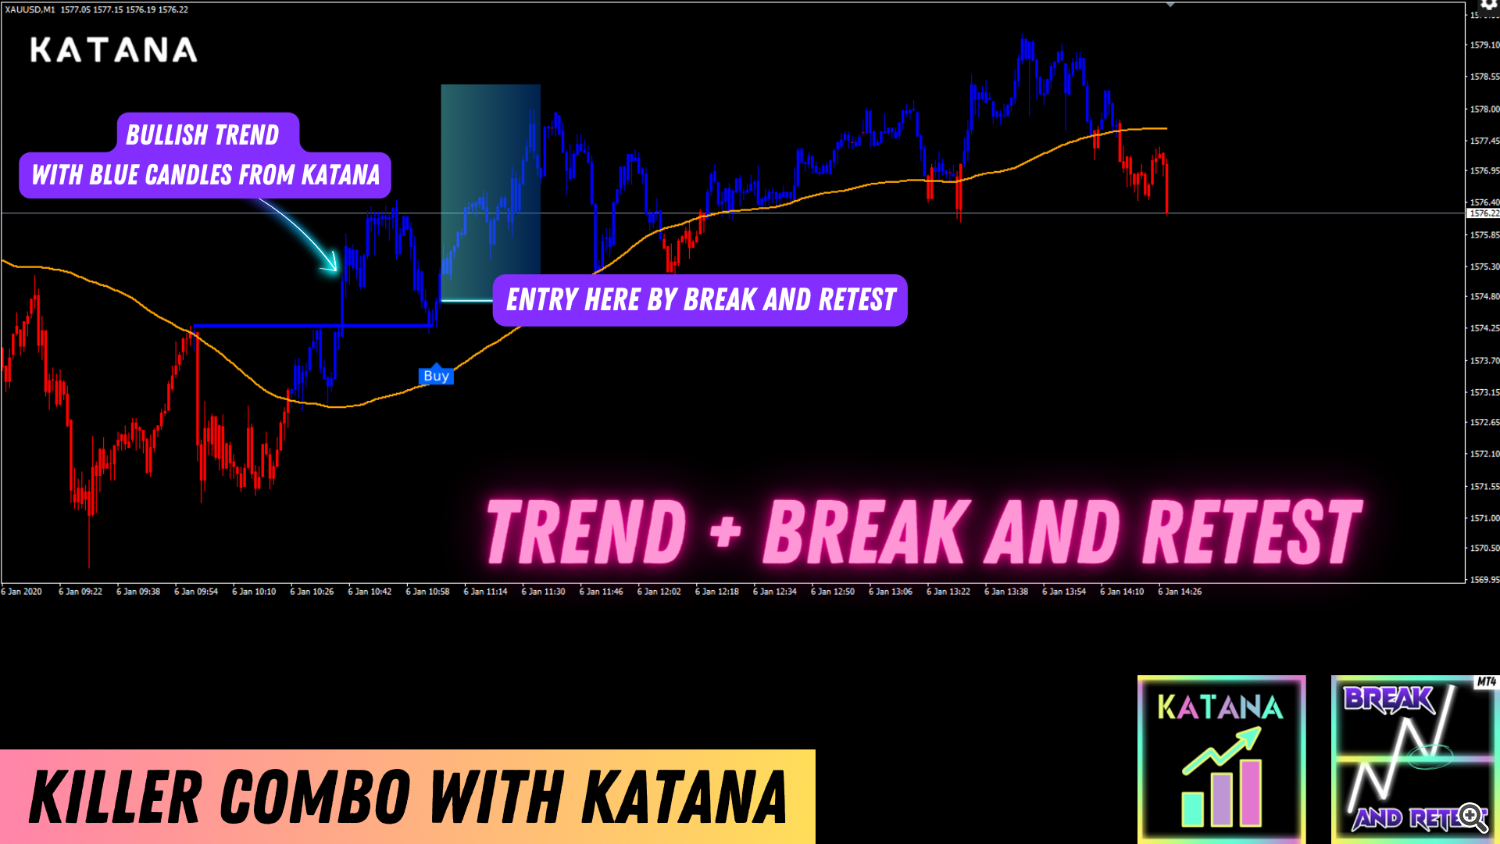
The right way to commerce Break and Retest with the Pattern?
If you wish to be a grasp in buying and selling, you have to do not forget that development is all the time your good friend! When a Break and Retest occurs, you need to just be sure you’re on the suitable aspect. That is the place our Katana indicator is useful. Katana offers you the primary development by utilizing transferring averages. If Katana visually exhibits you an uptrend whereas Break and Retest offers you a purchase sign, it is the time to enter a commerce thanks to those 2 highly effective indicators!
Right here is an instance:
Get Break and Retest right here: https://www.mql5.com/en/market/product/115398
Get Katana right here: https://www.mql5.com/en/market/product/74631
Thanks for studying our handbook information and please do not hesitate to contact me you probably have any questions!
Cheers,
Mo


